Everything you need to know about Git
This is article, We will be talking about what is git, how to install it and how to use it to manage development in a team. We will also walk you through a real life example to managing a project with git and multiple scenarios of activities that can occurred
History of Git
- Started in 2005
- Created by Linus Torvald to aid in Linux kernel development
- Distributed Version Control System
- Each developer has a working copy of the code and full change history on the local computer.
Set up and installation
- Linux (Debian)
- Command: sudo apt-get install git
- Linux (Fedora)
- Command: sudo yum install git
- Mac OS
- http://git-scm.com/download/mac
- Windows
- http://git-scm.com/download/win
What is the purpose of Git?
- To manage a project, or a set of files, as they change over time.
- Git stores this information in a data structure called a repository.
- A git repository contains, among other things, the following: A set of commit objects.
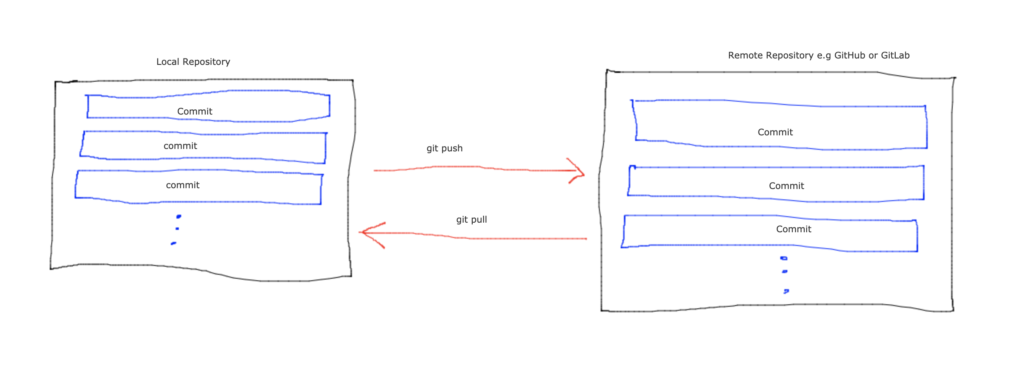
Repository can be locally on the user’s computer or remotely on a server.
Example of a remote git repository is GitHub or GitLab.
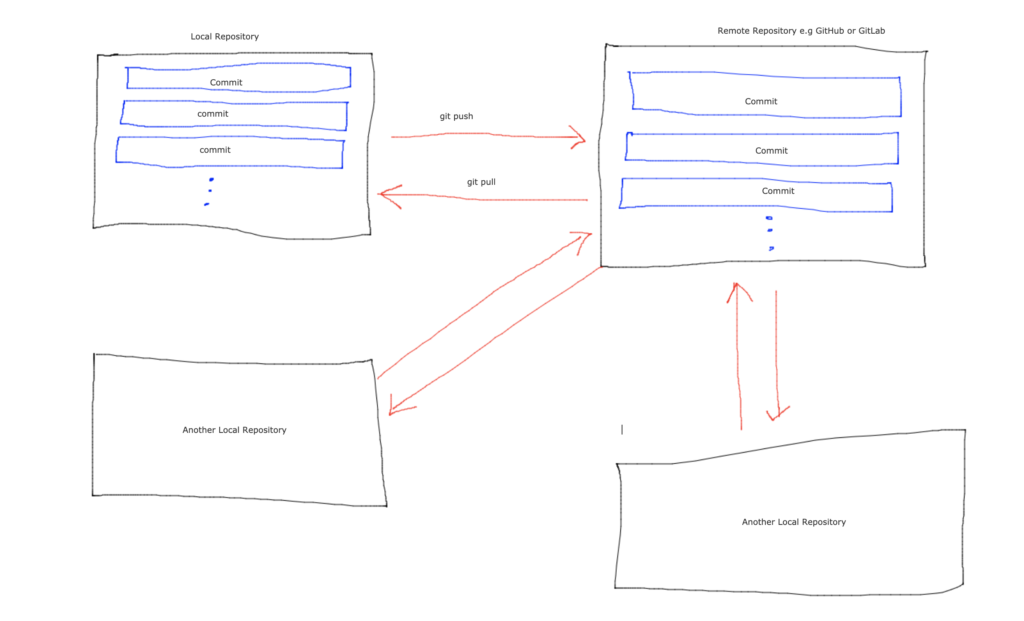
These are applications that help developers maintain a copy of their code or files remotely for the main purpose of sharing among other developers.
For us to completely understand git, Imagine you are a new team member of a project of four developers working on different computers on different parts of the same project.
Cloning a Git repository
Now that you are part of the team and you have setup up your computer with git, The first thing to do is to get a copy of the entire project onto your computer.
Git repository is just a file location where you are storing all the files and folders related to your project. A remote repository generally lies somewhere outside your system, on a remote machine.
The process of getting a fresh copy of the project on to your local computer from a remote repository is call cloning. During cloning there are two things you need to be aware of
- The project URL
- Do you have access to the project?
Project URL is copied from the remote repository hosting domain. When you create a GitHub or GitLab project, you will be given a repository url called origin url. An example of such url is : https://github.com/eddytnk/docker-commands-cheatsheet.git
Once you have the url of your new project, the next thing you have to verify is if you have access to the project. You will typically ask System admin this question or project owner. the origin url i gave above is a public project, meaning everyone in GitHub can clone that project.
Once you have origin url and access to the project, move to the project directory on your computer and type this command to clone.
git clone <project-origin-url>Example:
git clone https://github.com/eddytnk/docker-commands-cheatsheet.gitAfter cloning this project, you will have a new project folder in your project directory. When you navigate into this project directory, you will see all the project files, codes and a special hidden folder (.git). Do not mess with this folder. It contains all files changes and change history (commit history) of the project.
Pushing to a repository
Now that you have the project on your local computer, you can start coding :). During coding, you will make changes to the project files. Maybe remove some files, add new files, and modify some existing files. When you feel like you have successfully make all your changes to the code and you want to other developers to be able to see your nice looking changes to the project, there are three things you need to do
- Add your changes to be shared, git add
- Take a snapshot of your change, git commit
- Share your changes with others, git push
Add your changes to be shared, git add
In order for git to know which part of all what you have changed you intend to share with others, you are expected to add this files to the staging area to be committed. When a file is in a staging area, it means it is ready to be added to the project commit.
Make sure your terminal or command line is in the root of the project directory, Then type this command
git add <directory-of-file-to-be-added-to-staging>You will have to add all the individual files one after the other or if you just want to add all changed files to staging area, use this command
git add .The above command means add all changed files and folders and subfolders from my current directory to the staging area.
Side note
add * means add all files in the current directory, except for files whose name begin with a dot. This is your shell functionality and Git only ever receives a list of files.
add . has no special meaning in your shell, and thus Git adds the entire directory recursively, which is almost the same, but including files whose names begin with a dot.
git status will show you all the files that are in your staging area. That is files you have added and once you have not added
Take a snapshot of your change, git commit
After you have added your files, folders and subfolders to be shared, the next thing is to take a snapshot of the project so far in a process know as git commit. A Projects is made up of a bunch of files and their commits and each commit has the following information
- Information of what has changed from previous commit (file and their line numbers changed or files added)
- Referents to the parent commit (previous commit before this)
- A hashcode name to uniquely identify the commit
- A friendly message about the commit
When you git commit your code, a version/snapshot is created in your local repository
You can think of a commit as saving the project so that you can be able to roll-back to it in need be. Developer typically commit their project when a particular task or story is completed. To commit your project use this command
git commit -m "<commit-message>"Example:
git commit -m "Add the login functionality"Share your changes with others, git push
Now that you have add a new commit, the next step is to share your changes with other developers. This is done by pushing your changes (commit) to the remote repository (GitHub). Use this command to push your commit
git pushThis command will merge your code changes to the one on the remote server. In this way other developer can pull you changes.
Here is an example of push to a remote repository. (make sure you are at project root directory)
git add .
git commit -m "Add the login functionality"
git push
So far, we have been able to learn how to clone a project and push our changes for other developers to see. Obviously the next step will be how do we see changes by other developers and what happens if two developer make changes on the same file.
Pulling from a Repository
Pulling from a remote repository is the process of getting the commit from other developers into you local repository (project on your computer).
To pull changes from a remote repository into your local repository (project folder on your machine) make sure you have no un committed changes on the version of the code on your machine.
That is to say you have to commit your own changes witg git commit to create a new snapshot or version before pull another version of the code. To pull the code use the command:
git pullThis command will pull the latest version of the code to your local machine (local repository).
If you have NO un pushed commit on your local repository, you will have no problem running git pull. Otherwise you should watch out for merge conflict.
Merge conflict
Merge conflict occurs when a file has been modified on your local repository commit and also on a commit on the remote repository which you haven’t pulled on your remote repository.
To understand this, let assume two developer A and B are working on a project. Both developer pull the latest version of the project on the machines and started adding changes to the project files.
Developer A, on the course of adding new feature to the project makes a change in a file called User.java (perhaps adds a new method/function call verifyEmail() to this User. java class).
Developer B, on the course of adding a new feature to the project makes a change in the same User.java (perhaps adds a new method/function call changeUsername() to the User.java class).
Now developer A is finished in his task he then commit and push to the remote repository. Now the version of the project in the Remote repository is later than the version of the project Developer B is currently working on.
Now, Developer B, finished with his task, commit and tries to push. Git will reject the push because the version of the push on the remote repository is latest than the version on his local repository. To solve this problem, Developer B is required to git pull before git push
When Developer B git pull, the pull will be successful but there will be merge conflict on the file User.java file. This is because the line number of the User.java file changed from the time Developer A pushed and git do not know from what line number to add Developer B changes. A human intervention is needed to resolve this conflict.
Git will append the two changes next to each other enclosed with the symbol <<<<<<< HEAD indicating the first line and >>>>>>> master indication the last line. The both changes in the enclosed symbol will be separated by ======
Example:
public class User {

<<<<<<< HEAD
    public void verifyEmail(String email){
//        ...
    }
======
    public void changeUsername(String currentUsername, String newUsername){
//        ...
    }
>>>>>>> master
}
Developer B, is expected to resolve the conflict by add the two new method in the User.java file and then after type the code
git rebase --continue
git push
Side note
git merge --abort Executing git merge with the --abort option will exit from the merge process and return the branch to the state before the merge began.
git reset can be used during a merge conflict to reset conflicted files to a know good state
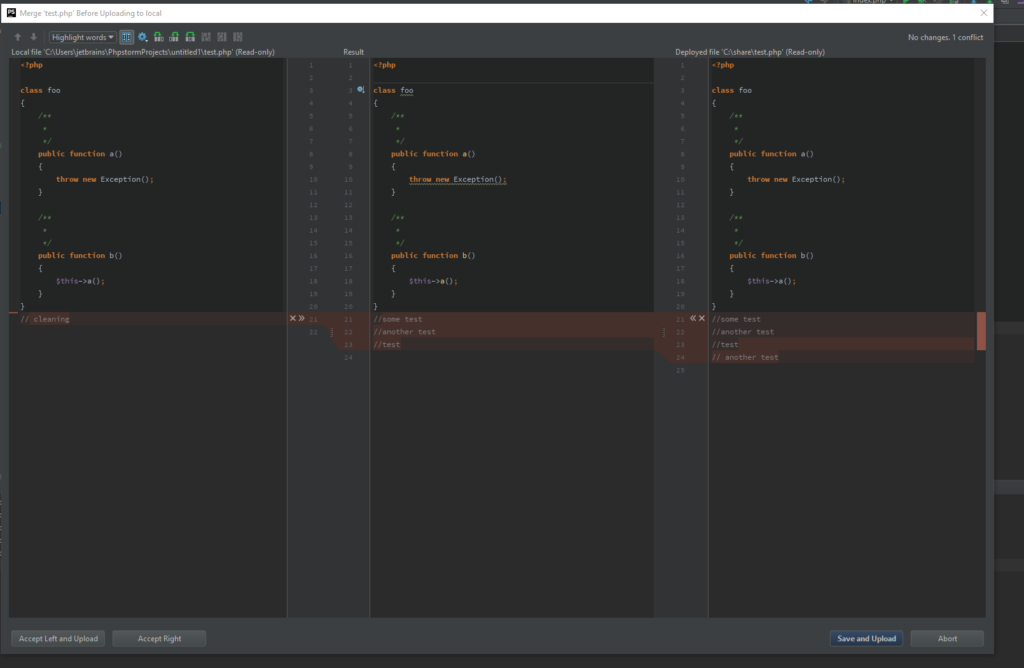
However, IDE usually comes with user friendly tools to help result merge conflict faster.
For example, Inteliji IDEA divide the window into three section during merge conflict of a file. Developer just simply section what code block to add or remove and then click apply.
So far, we have been able to pull project changes and resolve merge conflict.
What next ….
Git Branching
- All commits in git live on branch
- They can be many branches
- The main branch of a project is the master branch
Think of a branch as making a copy of your project on another folder. When you create a git project, you will, by default, have one branch “one folder” for your project call the master branch.
However, you can create other branches and you can also be able to merge two branches into one.
In this section, we will be looking at creating branches, deleting branches and merging branches.
git branch <branch_name>Create a new branch called <branch_name>. This does not check out the new branch.
Example: git branch release will create a new branch call release having the latest copy of the project.
The git brach command will not immediately take you in to the new branch or better new folder. To enter into a new branch user
git checkout <branch_name>Example: git checkout release will move me into the release branch. When you are in a branch all the changes you make will only be on that branch and will not be seen in my other branches.
Creating a branch could be a good way for developer to test ideas or spike through a concept on the project without messing the real code and before actually implementing it
Creating a branch could also be a good way to separate what part of the project is good to go for production, or user acceptance test or still under development.
git branch -d <branch_name>Delete the specified branch. This is a “safe” operation in that Git prevents you from deleting the branch if it has unmerged changes.
git branch -D <branch_name>Force delete the specified branch, even if it has unmerged changes. This is the command to use if you want to permanently throw away all of the commits associated with a particular line of development.
git branch -m <branch_name>Rename the current branch to <branch>.
git branch -aList all remote branches.
git checkout -b <branch_name>The above example simultaneously creates and checks out <branch_name>. The -b option is a convenience flag that tells Git to run git branch <branch_name> before running git checkout <branch_name>.
Git Merge
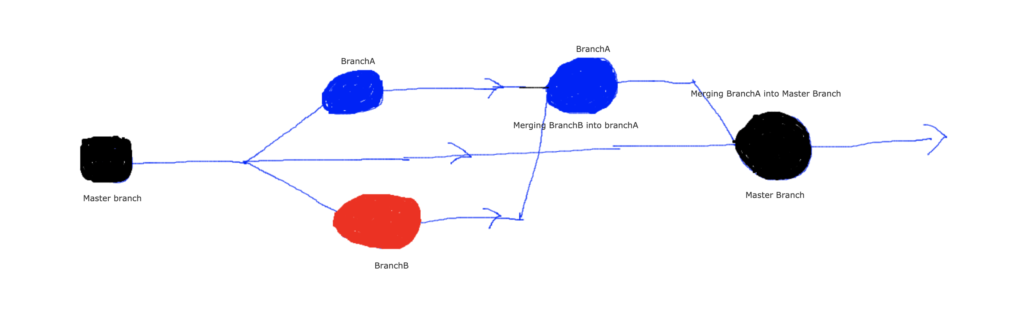
Git merge is a way to bring the changes in two branches together. To understand this, let assume Developer A, create a branch call BranchA while developer B create another branch call BranchB.
Both developers made some changes in their separate branch. But then Developer A wants to merge all the changes in BranchB to his branch, BranchA and then merge all the combined changes to the master branch
- Checkout to BranchA
git checkout BranchA - Merge BranchB into BranchA
git merge BranchB - Checkout to master
git checkout master - Merge BranchA into master
git merge BranchA
As I have always come to experience overtime working with git, it will all come naturally when the concept is clearly understood. You just have to start working on a project using git
My advise will be to first create a free GitHub account and install git on your machine
Thanks dear readers, I hope you like this topic. If you want me to do a write-up on something just like this one, send me an email to : me@eddytnk.com with the topic.


thank you for the write-up sir. it has been very helpful to me.