Everything you need to know about deploying your micro service in a docker container
Application deployment is the final result of all the development processes. After all the analysis, design, implementation and testing your application will need to be deployed for users to access it.
There are many ways in which applications are being deployed but what is common is the deployment environment. You maybe deploying your application locally or on a development environment and it works well but the time you move it to the production or another hosting environment things start breaking. What container deployment brings is the opportunity to have your application deployed in the same environment no matter the OS or machine you will be hosting your application .
Introduction
In this article, I will be working through, with detail explanation and illustration with example on how to deploy your application in a docker container.
Before we move forward, there are some basic concepts and skills you may need to know. Luckily I have written articles on all this skills
- Understanding of images and container – Everything you need to know about containers and images
- Understanding the Docker commands – Getting started with Docker and Docker Compose
Please do well to go through the above two articles before you continue if you do not have experience with the technologies listed.
As always, my people, I will start by defining a real life example and we will work through it and at the same time understand the concepts and approach. I will do well to introduce concepts in a friendly approach that is easy to grasp.
Assuming we have our “Hello World” java application that need to be deployed in a tomcat web container.
Web container also known as a Servlet container is the component of a web server that interacts with Java servlets. A web container is responsible for managing the lifecycle of servlets, mapping a URL to a particular servlet and ensuring that the URL requester has the correct access rights
Normally, a simple approach to deploy our *.war in a tomcat web container is:
You have the web application in its unpacked form.
- Copy the application’s directory from its location into $CATALINA_HOME/webapps directory.
- Restart the server, the application is deployed with the context path is name of the directory you copied.
NOTE: If you want to update changes for the application, you must replace the corresponding files under its document root directory.
What this approach entails is if you have multiple instances of your application and you wish to deploy in different servers, you will have to install tomcat on those servers, configure the environment to be the same like all the others environment, set up all the necessary credentials and stuff to make sure the application runs the same in all the other servers.
Ofcourse they are smart ways to make sure your server configurations are the same by using ansible in setting up your environment. But what if different microservices of your core application runs on different OS or environment, you will also need configuration specification for all these services which may become crucial to manage and prone to mistakes
To solve this problems, what if there is an environment that can host different environment for different specification of your application? lol!!!
There are multiple cloud solutions to help you manage your application deployment in the cloud as a container. Solution like kubernetes is primarily build for such application scaling and deployment management of containers. Kubernetes will be an article in the near future in this our interesting blog. For today, we will learn how I can install your app in a docker image and run the image as a deplorable container with your app in it.
What are we doing?
Now back to business, We are going to:
- Pull an Ubuntu Docker image
- Install tomcat
- Set up application environment variables
- Install application on the image
- Build a new Docker image with our application and all is necessary environment
- Run the docker image so that is launches our application
Please make sure you follow this steps and try the commands your self
Here is the repo of the sample application we will be deploying in the container. Clone this repo and follow along
https://github.com/eddytnk/hello-word-war
This application just display a message “Welcome to EDDYTNK.COM” when the browse in http://localhost:8080/hello-world
The message “Welcome to EDDYTNK.COM” will be set as an environment property to the application as a seen in the MessageController.java file
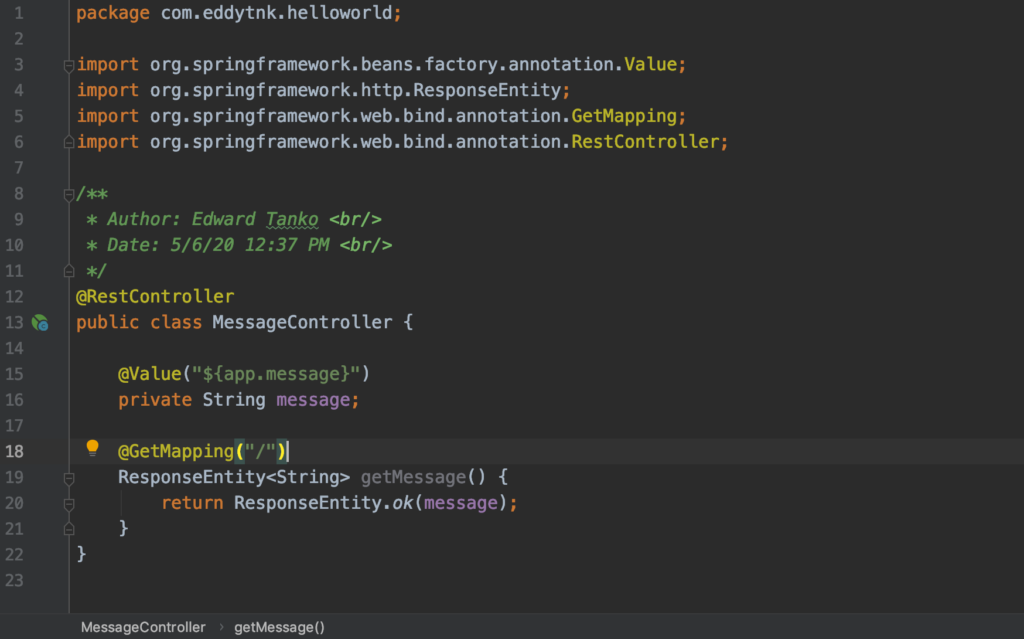
The aplication-prod.properties file has the message which is read from the environment. HELLO_MESSAGE.

After you clone this repo, create the Dockerfile in the root of the project so that we can start building the deployment container
Here is the complete Dockerfile to pull ubuntu image and install Tomcat. Let work through it.
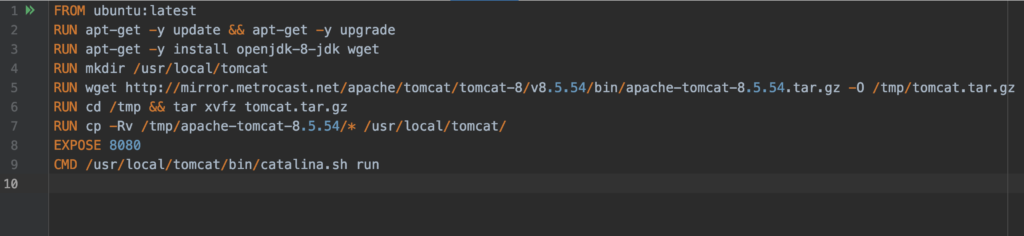
Line 1: Tell docker to pull the latest ubuntu docker image from docker hub, which will be used as the based image for our application
Line 2: Has the RUN command, which is simply an instruction to execute when the container is about to be creates. This line update and upgrade the apt-get ubuntu application package installer.
Line 3: Install openjdk-8 and wget. openjdk will install the JRE which tomcat needs to run and it will also set the JAVA_HOME environment variable. :). Wget is a tool need to download packages from the internet. We need it to download tomcat package.
Line 4: Make a directory at urs/local/tomcat which is where we want to install the tomcat
Line 5: Using the wget, download tomcat from http://mirror.metrocast.net/apache/tomcat/tomcat-8/v8.5.54/bin/apache-tomcat-8.5.54.tar.gz and rename the download file as tomcat.tar.gz
Line 6: Change directory into the /tmp and unpack tomcat.tar.gz
Line 7: Copy all the content in the unpack apache-tomcat-8.5.54/* into the /usr/local/tomcat/ which we created at line 4.
Line 8: Using the EXPOSE command, make the image to expose port 8080. The EXPOSE instruction informs Docker that the container listens on the specified network ports at runtime.
Line 9: use CMD docker command to /usr/local/tomcat/bin/catalina.sh runs the catalina.sh start script to start the tomcat server.
Now, we have define our Tomcat docker environment but we do not yet have our application set up.
Before we set up our application in the image definition, let test if the tomcat is installed and running.
Make sure you are in same directory as the Dockerfile, then run this command:
docker build -t eddytnk/myapp .
Do not forget the dot (.)
This command will create a new docker image using the ubuntu base image and in this new image, it will install tomcat.
When this image is run, it will start a container and will start tomcat on it default port 8080, with is also the port we expose to docker.
Use this command to run the image just created
docker run -d -p 8080:8080 eddytnk/myapp
How if you navigate with your browser to http://localhost:8080/ you will see the tomcat server interface running from your docker image

If for any reason you are not understanding these docker commands, make sure you have read the prerequisite articles
- Understanding of images and container – Everything you need to know about containers and images
- Understanding the Docker commands – Getting started with Docker and Docker Compose
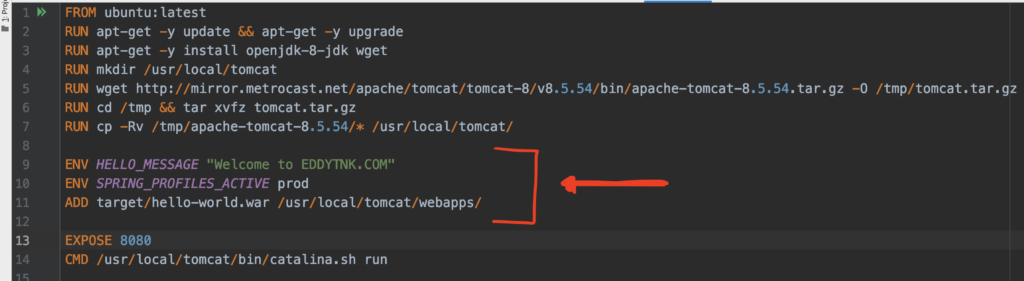
Let’s add our application to the Dockerfile image definition.
Add this line: ADD target/hello-world.war /usr/local/tomcat/webapps/ and also set the active production properties that has the environment variable HELLO_MESSAGE into the Dockerfile definition so that it now look like
create a build.sh script which will help you compile and build the .war file, this build.sh script should be in the project root directory
#!/usr/bin/env bash
./mvnw clean package
mv target/hello-world-0.0.1-SNAPSHOT.war target/hello-world.war
docker build -t eddytnk/myapp .
docker run -d -p 8080:8080 eddytnk/myapp
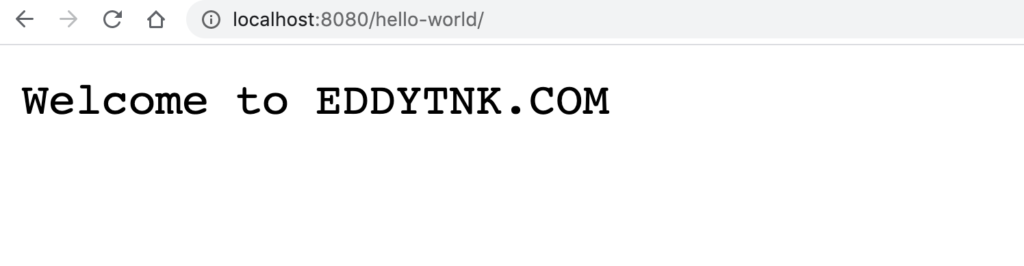
This script will build the .war file, rename it to hello-world.war, build the docker image and finally start the container at port 8080.
So if you open your browser at http://localhost:8080/hello-world/ you will see the welcome message displayed
What have we done?
From the set up, No matter what environment we are, we can just run the build.sh script that will start our application on port 8080. The only condition is that, that machine should have docker installed.
The good news is that instead of running the image, we can push this image in our docker repository so that we can pull it in different machines and just run. In this way, we can start an instances of our application on any machine with no configuration, We can have multiple machine pull same image and create a cluster of instances of our application with no configuration.
To learn more about deploying your newly created docker imaging on a docker cluster, please read this my article.
Thanks dear readers, I hope you like this topic. If you are a teacher or a student and you want me to do a write-up on something just like this one, send me an email to me@eddytnk.com with the topic.

As always. What an enriching piece!
thanks sir.
Confirm pah