Everything you need to know about JWT
JWT stands for Json Web Token. It is a very popular way to do authorization in modern web application. It become very popular as a result of stateless microservices being used in modern web application
In this tutorial, we will be learning how JWT is used to secure web applications. The Structure of JWT Token and How server side application signs and verify a JWT.
Although JWT is commonly used to manage authorization but the idea is to allow two parties to securely communicate with each other as describe in the Open industry standard specification RFC 7519 that outlined the structure of JWT and how is it use for exchanging information or claims securely
How JWT is used for authorization?
Every authorization mechanism for our web applications all have one thing in common, HTTP.
HTTP is a stateless protocol which means every interaction MUST contain all the information needed for that interaction. NOTHING is remembered from before and no state is maintained for passed requests.
If the server application is static and available for everyone, then there will be no problem, but when the server application is dynamic (as in most web applications) there is a need to keep track of which user is allow to access what resources and what state is the user in. In this regards, the information one sends to the server will not only be what page or resource you want but also who you are.
To understand how JWT works it is important to understand how session token works before JWT started being used.
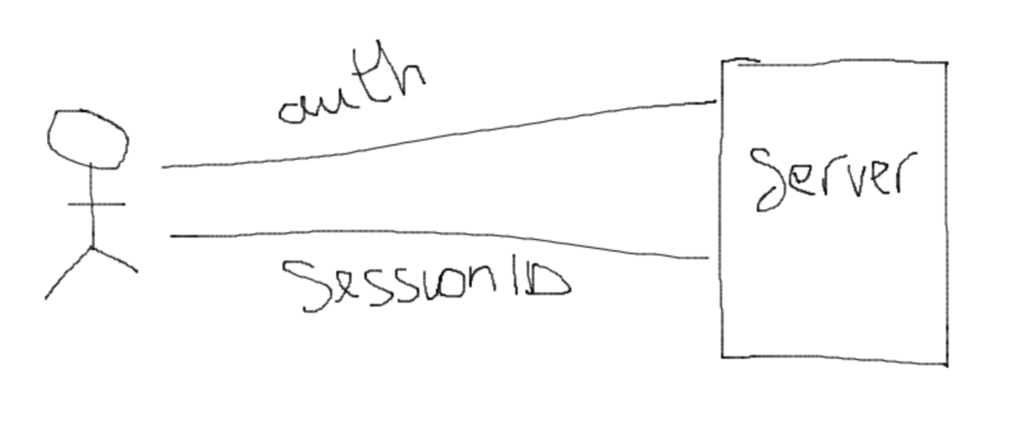
When user authenticate itself (with maybe username and password) the server verifies that user and create a session to keep track of itself and it also create a session ID and associate that session to it and response back to the authentication request with a session ID
Subsequently, the client passes this Session ID as a part of every request to the server and the server looks it up and identifies who the client is.
There are different approaches in which applications manages this Session ID but the most common approach is to save the session ID sent back from the authentication as cookie so that the browser (client) automatically adds it as Cookie header on every subsequent request.
This approach of using cookies has been working fine for a very long time and it is the most used.
However, There is a problem with this approach in modern web applications.
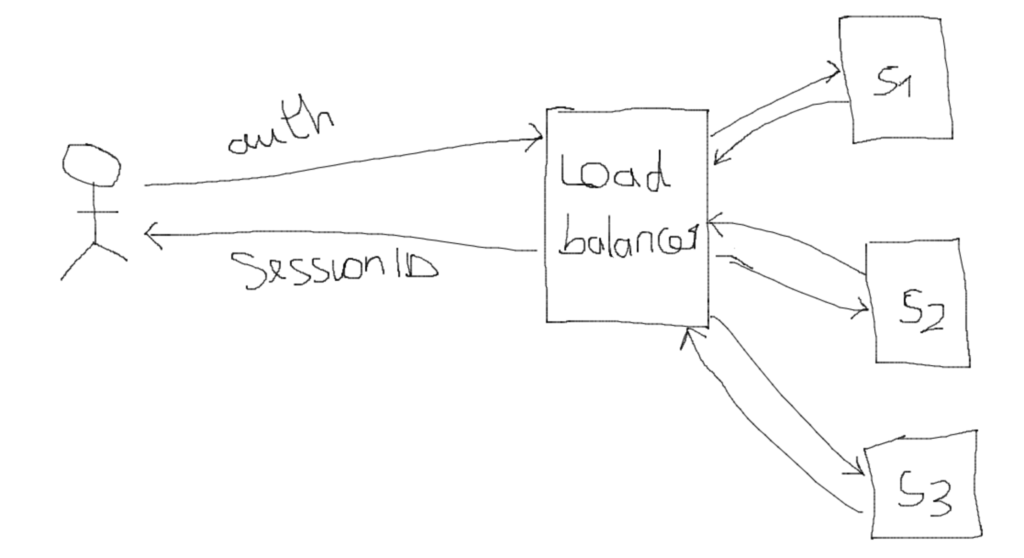
This approach assumes there is only one instance of the application running on the server. But in modern application, we may have multiple instances of our application running behind a load balancer that shares traffic among these instances. This means, if a particular instance is selected by the load balancer when user is making an authorization request, only that instance is aware of the user’s session. That instance would send a session ID to user but then if subsequent request is route to another instance by the load balancer, then the user is unidentified.
A solution to this is to introduce a single Cache Service for all the instances. This is a typical use case of the Redis Cache Service. The drawback to this solution is that, there will be now a single point of failure for the application.
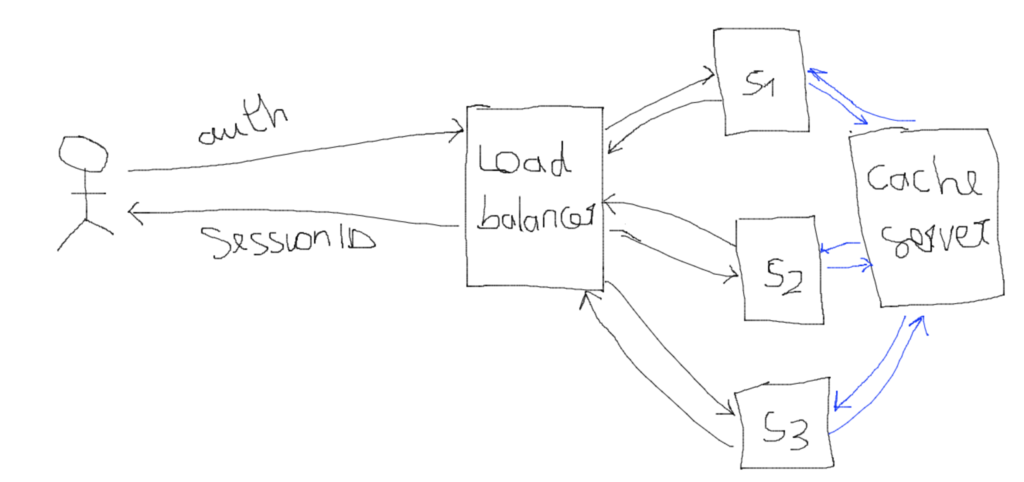
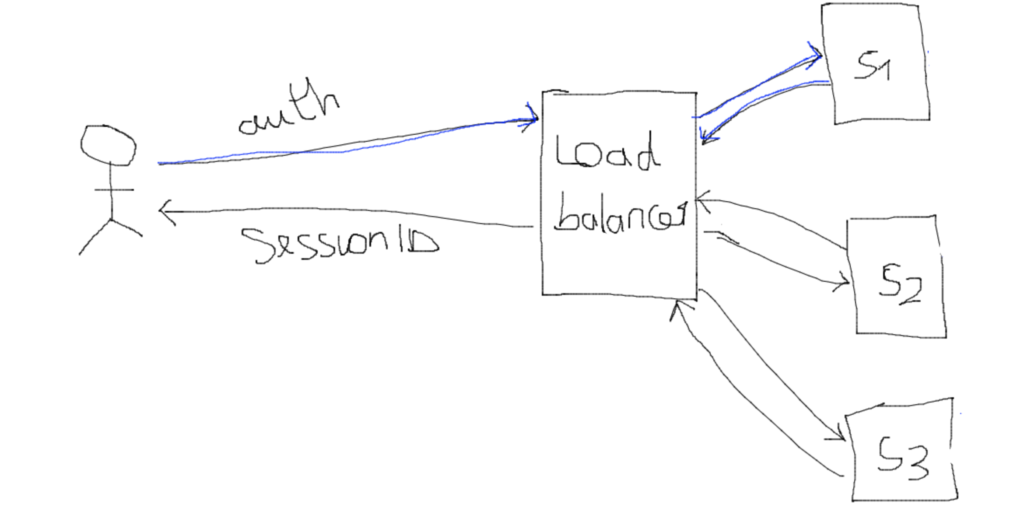
Another solution is to use the sticky session pattern where the load balancer remembers the user and always redirect to thesame instance. Which will not make our application properly scaleable.
Now let’s see how JWT is used to solve this problem
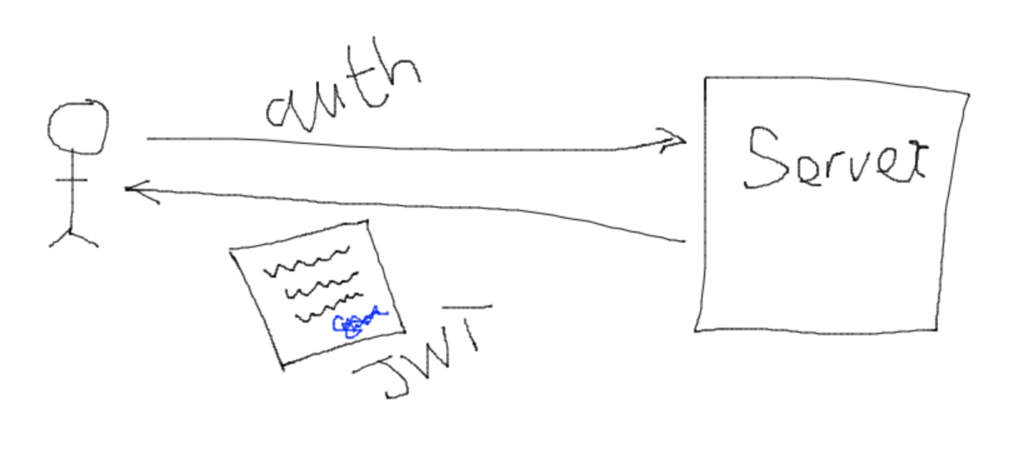
Let say, the Server do not remember state and do not generate Session ID during authentication and you don’t want the client to always provide authentication details forever request.
With JWT authorization, when the client provide username and password to the server, the server identifies the client, writes out all the authorization details about this client and give it back to the client. This details handed to the client is a special token called Json Web Token (JWT).
When ever the client makes a request to the server, the client is expected to provide this special token to the server and then the server will read it out and identify who the client is. This approach has completely shift the server from the responsibility to keep the state (identity) of the client and now the client has the responsibility to identity itself with this special token.
- What if the client changes the token to identify someone else how will the server know?
- What if the client change the token to have more admin privileges how will the server know?
To answer these two questions, we have to understand how special this special tokeN called JWT is.
Each time the server is handing the JWT to the client, the server will sign the token with a secret key only known by the server. When the client make a subsequent request passing the JWT, the server will verify if the token presented by the client was signed by it and only then will the server trust the token. In this way, if the client changes or temper with the information in the token then it will not pass server side verification.
When client send username and password to server, server verifies and identify the user then generate a JWT for that user. The JWT is a special token that has information able the user like ID and permissions of the user on the system. Then the client received this signed JWT it uses it when making subsequent request to the server. The server will received this request and the first thing it does is to verify the JWT. if the signature is verify it will then open the JWT and get the user’s information and permission in the token.
How does the Server sign JWT ?
To answer this question, we will have to understand the structure of the JWT .
JWT token is made up of THREE parts separated by a dot(.) after each part:
Ex: header.payload.signature
- Header
The header is a JSON object typically consists of two fields: the type of the token, which is JWT, and the signing algorithm being used, such as HMAC SHA256 or RSA.
Example
{
  "alg": "HS256",
  "typ": "JWT"
}
Then, this JSON is Base64Url encoded to form the first part of the JWT string
2. Payload
The second part of the token is the payload, which contains the claims. Claims are information about user and maybe additional data to be shared
Example
{
  "sub": "1234567890",
  "name": "John Doe",
  "admin": false
}
Then, this JSON is Base64Url encoded to form the second part of the JWT string
3. Signature
To create the signature part of the JSON you have to take the encoded header, the encoded payload and a secret using the algorithm specified in the header generate a signature from this combination.
For example if you want to use the HMACSHA256 algorithm, the signature will be created in the following way:
HMACSHA256(
  base64UrlEncode(header),
  base64UrlEncode(payload),
  secret)
This function will generate the third part of the signature.
These three part combine with dot(.) will look like
eyJhbGciOiJIUzI1NiIsInR5cCI6IkpXVCJ9.eyJzdWIiOiIxMjM0NTY3ODkwIiwibmFtZSI6IkpvaG4gRG9lIiwiaWF0IjoxNTE2MjM5MDIyfQ.SflKxwRJSMeKKF2QT4fwpMeJf36POk6yJV_adQssw5cHow the server verify the token?
When the server receives a request with JWT to verify, It will take the header of the token combine with the payload, adds the secret which it has private and generate a signature. It then compare this signature with what was sent in the token if it is the same then the token is trusted and has not been tempered but if it is different, then the token values has been change.

Thanks dear readers, I hope you like this topic. If you are a teacher or a student and you want me to do a write-up on something just like this one, send me an email to me@eddytnk.com with the topic.

